
the Printout Definition code list is used to define all printouts used in the leasing company and to set parameters for printing, for outputs that are printed from One. Core objects (e.g. Financing Contract, Financed Object, Framework Agreement, Insurance Contract, etc.). Does not apply to standard printouts such as invoices, credit memos, purchase orders.
spinner Printout Right it is used to define specific users for the right to print a specific document. If the user does not have permission to print the document, the system will not allow them to select the document to print or send by e-mail.
TO complete it, you need to set up other code lists (filters in Printout Definition).
To set up printouts, you need to set up two tables:
-
Printout Definiton
-
Printout Permissions
Replace Customer Report Layouts with the Report Layouts table
Functionalities have been marked by Microsoft Customer Report Layouts "Obsolete". For this reason, we have decided to replace it Report Layouts.
For a description of the conversion, see later in a separate chapter.
Navigation:
Printout Definition
Availability of the dial via magnifying glass, Manual Setup or Configuration Book, name Printout Definiton. After confirming the selection, the Printout Definiton overview opens
Field:
-
CODE
-
: REPRESENTS a unique code that the user enters manually. The code can be alphanumeric with a maximum length of 20 characters. We recommend creating it in such a way that it is easy to remember and helps the user identify what type of printout it is by the code
-
-
NAME:
-
THE user manually enters the name/description of the printout
-
-
TABLE ID:
-
THE user selects the ID of the table from which this printout can be printed
-
-
TABLE NameFills
-
In the system automatically according to the selected table ID in the previous step
-
-
REPORT ID:
-
THE user selects the report ID from the object table – type = Report if the printout is the Report object
-
-
REPORT
-
NameFills in the system automatically according to the selected report ID in the previous step
-
-
Print Category:
-
This hard-coded list allows you to specify the type of output category (which output it is). The table administrator can select one of the preset options:
-
Blank
-
MASTER Agreement
-
CONTRACT Proposal
-
Contract Object
-
Order
-
HANDOVER Protocol
-
Terms and Conditions,
-
APPENDIX
-
Tank blocking. Cards
-
Additional Equipment Order
-
Information Delivery Date Change Information
-
3rd Party Information Non-agreed
-
Handover date
-
Information to the customer about the expected completion date
-
Driver information about handover
-
Fmn information about handover date Tire
-
Order
-
Gt Notification Email Information
-
About the approval of the draft contract
-
-
WHEN selecting a print category on a line with a non-empty Customer Number, the system will check if there is another line with the same Customer No. and Print Category
-
If it exists, it will display an error message and will not allow you to continue If
-
It does not exist, it will save the Print Category
-
-
-
customer No.
-
It is used to create a template for a given customer (see also PD Address Book))
-
If the user creates a line from a customer, the Customer No. is filled in automatically
-
If not from the customer, the user can select the customer number (lookup)
-
WHEN a customer number is selected, the system checks to see if there is a row with the same non-empty Print Category:
-
If it exists, it displays an error message and does not allow to continue (there can be only one template with the same print category for a given customer
-
If it doesn't exist, it allows you to select the customer number
-
-
-
CUSTOMER NameFills
-
In the system automatically according to the customer number
-
-
Number of Printed CopiesThe
-
USER manually enters an integer for the number of printed copies of the printout, with a minimum of 1
-
-
List (Sheet)
-
The code list manager selects the sheet of the XLS file that is the template for the print output and has been imported into the OC
-
-
CUSTOMER Report Layout Code
-
The user selects the template code of the given printout in Word, if a custom layout has been created for the report
-
Lookup to Customer Report Layouts
-
Field visible if Show New Report Layouts =N in OneCore Settings, see OneCore Settings for detailed description. Nastavení OneCore
-
-
Customer Report Layout Description
-
A description of the custom report layout, the system will fill in automatically
-
Field visible if Show New Report Layouts =N in OneCore Settings, see OneCore Settings for detailed description. Nastavení OneCore
-
-
EMAIL Body Layout Code
-
EMAIL Body Template Code in Word, Based On What Will Then Populate The Email Body
-
Lookup to Customer Report Layouts
-
Field visible if Show New Report Layouts =N in OneCore Settings, see OneCore Settings for detailed description. Nastavení OneCore
-
-
Email Body Layout Description
-
Description of the e-mail body template, based on what the e-mail body is then filled, will be filled in automatically by the system
-
Field visible if Show New Report Layouts =N in OneCore Settings, see OneCore Settings for detailed description. Nastavení OneCore
-
-
REPORT Layout Name A
-
New field, visible if Show New Report Layouts=Y in OneCore Setup, see OneCore Setup for a detailed description. Nastavení OneCore
-
Editable, lookup to Report Layout List.
-
-
Report Layout Description:
-
A new field visible if Show New Report Layouts=Y in OneCore Setup, see Report Layout Description for a detailed description. Nastavení OneCore
-
Editable, lookup to Report Layout List.
-
Non-editable, completes OC after selecting Report Layout Name
-
-
EMAIL Body Layout Name
-
New field, visible if Show New Report Layouts=Y in OneCore Setup for a detailed description see. Nastavení OneCore
-
Editable, lookup to Report Layout List.
-
-
Email Body Layout Description
-
New field, visible if Show New Report Layouts=Y in OneCore Setup for a detailed description see. Nastavení OneCore
-
Editable, lookup to Report Layout List.
-
Non-editable, completes OC after selecting Email Body Layout Name
-
-
MAIL Subject
-
A mask based on which the system fills in the subject of the email. You can use text variables:
-
%1 contract No.
-
-
-
MAIL Attachment Name
-
Mask,and based on which the system creates a name for the email attachment. You can use certain text variables:
-
%1 contract No.
-
-
-
Send To E-mail AddressThe
-
USER can specify a specific e-mail address where the e-mail with the attachment will be sent
-
-
Send To Work Responsibility (Send To)
-
The user selects the Job Responsibility of the customer's contact person to whom the email should be sent. As the recipient of the email, the system selects a contact person who has set up and valid the given Job Responsibility (in our case, Fleet Manager)
-
-
Send To DriverIf
-
A, the email will also be sent to the driver specified on the subject
-
-
Send CC
-
If specified, the email is CC sent to this email address as well
-
-
Send BCCIf
-
Specified, the email is sent in BCC to this email address
-
-
Financing Product Type Filter. The
-
USER selects the financing product types for which to print the printout
-
If the field is blank, the printout is printed for all financing product types
-
-
Financing Product FilterThe
-
USER selects the financing products for which to print the printout
-
If the field is blank, the printout is printed for all financing products
-
-
Detailed Contract Status FilterA
-
USER can manually specify a filter for a set of detailed contract statuses that must match the detailed status of a given financing contract in order for the system to print the given printout for that contract
-
-
LANGUAGE Code CustomerA
-
Filter for the template language code for which the system will offer a given print input
-
-
Object Category:
-
THE user can select the object category for which he defines the printout. Multiple choices:
-
ALL - applies to all course categories
-
Transportation technology
-
Machine – Equipment
-
Real Estate
-
-
-
Catalogue GroupThe
-
USER can select a group from the "Catalogue Group list" for which he defines the printout
-
If the field is left blank, it applies to all groups
-
-
Used Financed Object
-
FLAG that specifies that the printout will be printed only for financing contracts with the financed object used
-
-
Check Colour
-
If it is A, the OC will check if the color code is entered on the object before printing or generating an email
-
-
Check Interior Colour
-
If it is A, the OC will check whether the interior color is specified on the object before printing or generating an email
-
-
Include In PaymentsA
-
Filter for offering printouts from an insurance contract. This setting determines whether the system will offer a given printout on the insurance contract depending on the "Include in payments" parameter of the insurance contract:
-
ALL – The system will offer the printout for printing regardless of the value of the "Include in installments" parameter on the insurance contract
-
Yes – the system will offer printout for printing only for insurance contracts that have the "Include in installments" parameter = Yes
-
No - the system will offer printout only for insurance contracts that have parameter "Include in payments" = No
-
-
-
Insurance Type:
-
Filter for offering printouts from the insurance contract. This setting determines whether the system will offer a given printout on the insurance contract, depending on the type of insurance contract. The code list administrator can select one of the options from a fixed list:
-
ALL – the printout will be printable for all types of insurance contracts
-
Collection – the printout can be printed only for collection insurance contracts
-
Mass RPZ – the printout will be printable only for mass insurance contracts
-
Individual – the printout can be printed only for individual insurance contracts
-
-
-
Insurance Company FilterIn
-
This field, the administrator of the printout definition table enters the filter of the insurance company number for which he wishes to offer the printout for selection in the "Print Documents" window on the insurance contract
-
If the field is empty, the system will offer the printout for all insurance contracts
-
-
Insurance Product FilterIn
-
This field, the administrator of the printout definition table enters the filter of insurance product codes for which he wishes to offer the printout for selection in the "Print Documents" window of the insurance contract
-
If the field is empty, the system will offer the printout for all insurance products
-
-
Framework Agreement FilterIn
-
This field, the table administrator enters the printout definition filter of the framework agreement numbers for which he wishes to offer the printout for selection in the "Print Documents" window of the insurance contract
-
If the field is empty, the system will offer the printout for all insurance contracts, regardless of the framework agreement number
-
-
Set FilterIn
-
This field, the table administrator enters the printout definition filter of the insurance set for which he wishes to offer the printout for selection in the "Print Documents" window on the insurance contract
-
If the field is empty, the system will offer the printout for all insurance contracts, regardless of the insurance set.
-
Printout permission definition
Availability via the Permissions Setup button from Printout Definiton - "Permissions Settings", where it is possible to define user rights directly to a specific printout.
Field:
-
USER ID:User
-
SELECT the user ID from the "User Settings" code list, for whom you will set the right to print the document
-
-
PRINTOUT CodeThe
-
USER selects the printout from the "Printout Definition" code list, which will be available for printing for the selected user in the previous step
-
WHEN opening a table from Printout Definition, the system automatically pre-fills the code from the line where the user stood when opening the table
-
-
PRINTOUT
-
NameFills in the system automatically according to the printout code selected in the previous step
-
-
COMPANY Name:
-
THE user selects the company for which the user's right to printout the document applies
-
-
Number of Copies for User:
-
THE user manually enters an integer for the number of printed copies
-
THERE is also an option to add permissions of all users to a specific output - by the Actions / Insert permissions for all users button. The system then creates permissions for all users for a specific print output.
templates for defining printouts
templates for the definition of tick outputs can be prepared in Word, Excel or RDLC.
word Templates
If you want to output in Word, you need to create custom report layouts. On a specific line Printout Definition (Printout Definition) via the Custom Report Layout Code field (Custom Report Layout Code) you need to choose New. The system opens the Insert Report Layout dialog box (Insert Built-in Layout for a Report), where in the "Report ID" field there is a non-editable number of the source report ID (Report ID) the definitions for which the user creates the layout. The user checks the Insert Word Layout check box (Insert Word Layout). The system creates a new layout - the first part of the layout number is the "Report ID", the second part is the sequence number within the report.
Once you have created a custom layout, you can export it via Layout / Export Layout or Actions / Other / Export Layout:

To edit Word, you need to have the Developer option available.
IN your document, choose XML Mapping Pane (XML Mapping Pane). IN the right bar XML Mapping (XML Mapping) you need to choose Custom XML Part (Custom XML Part) source file with report ID (e.g. 4026492):
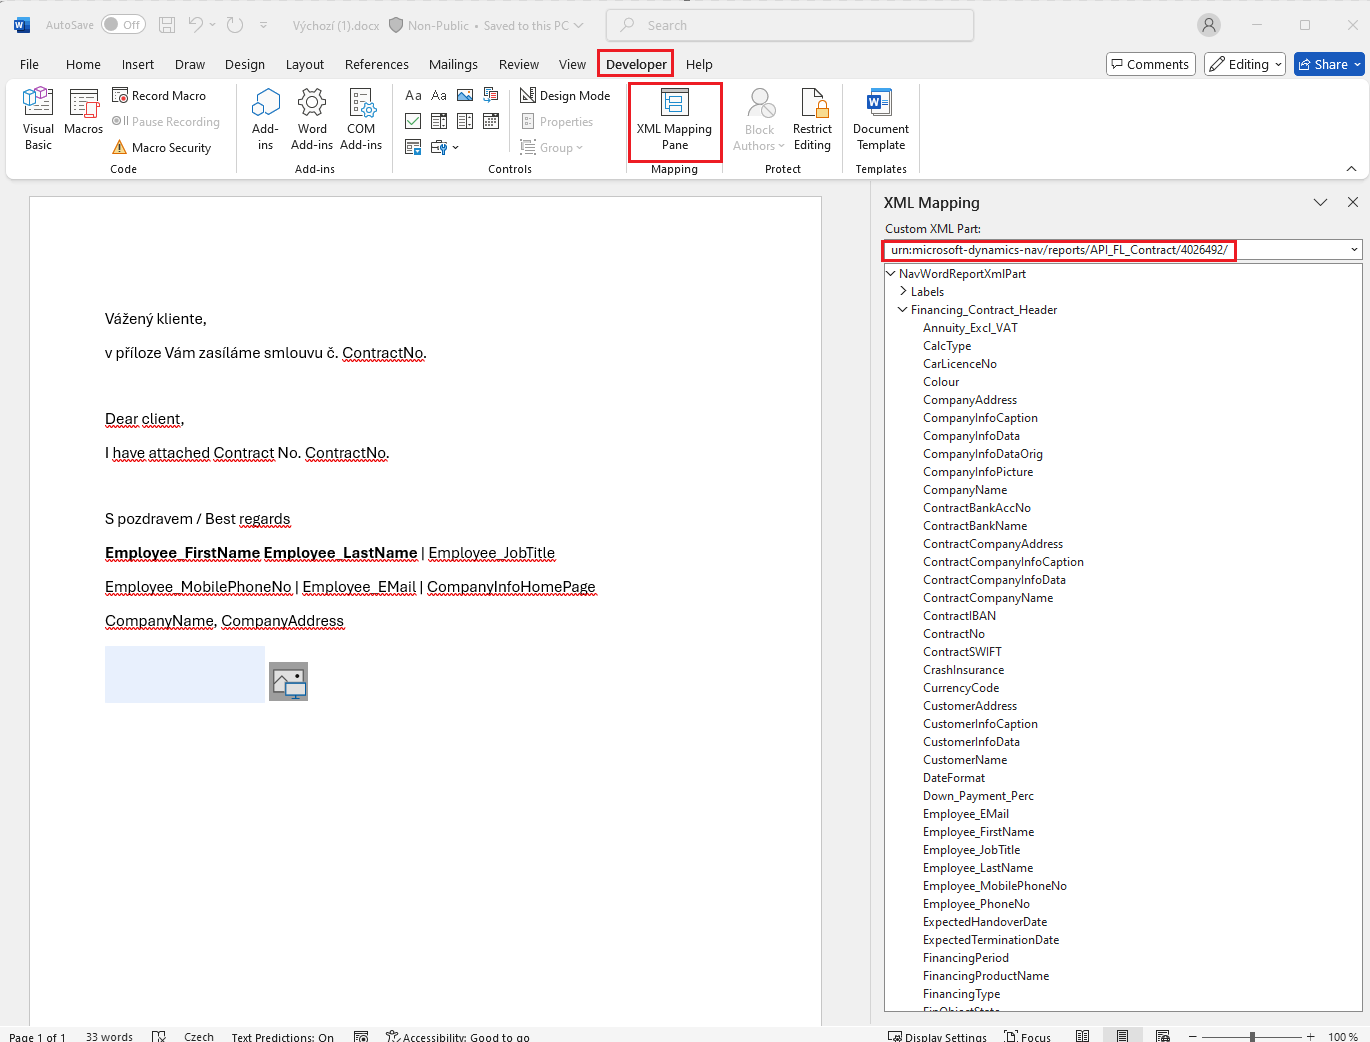
THUS, there are controls available, i.e. the fields of the report, which we work with in a standard way.
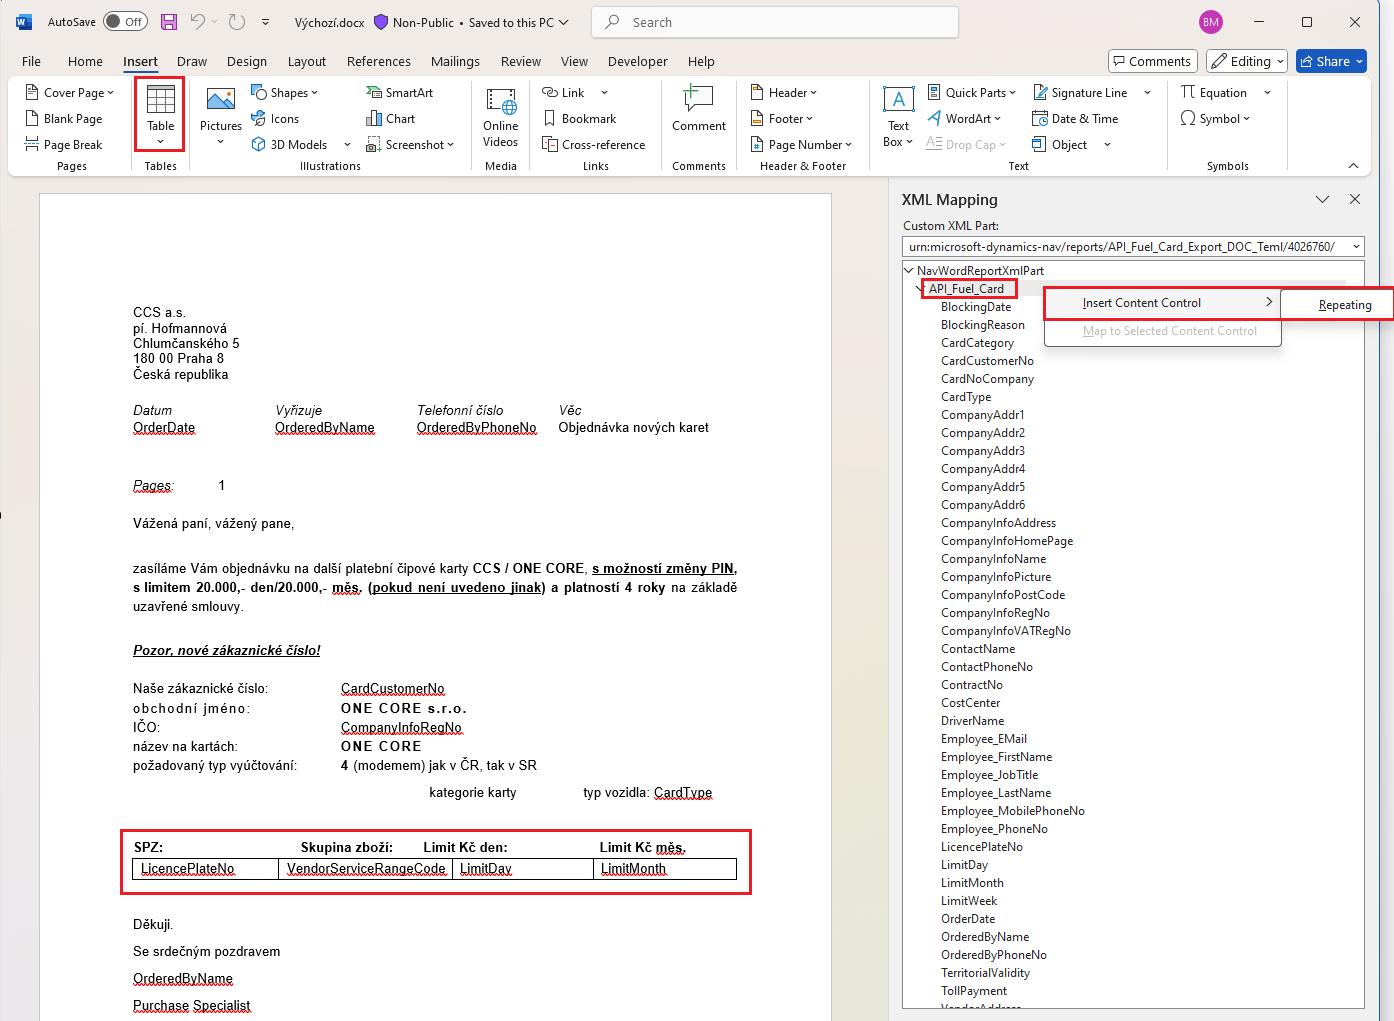
In the word-template, we can also create a table with repetition.
It is necessary to insert a blank table with e.g. 4 columns into the layout, turn on Recurrence above the selected table and the entire DataSet and then fill in the table with individual fields as "plain text":
If we have a layout ready, we can import into the appropriate layout via Layout / Import Layout or Actions / Other / Import Layout:

If the original report has been extended with DataSet, you can run the Update Layout function on the layout.
excel Templates
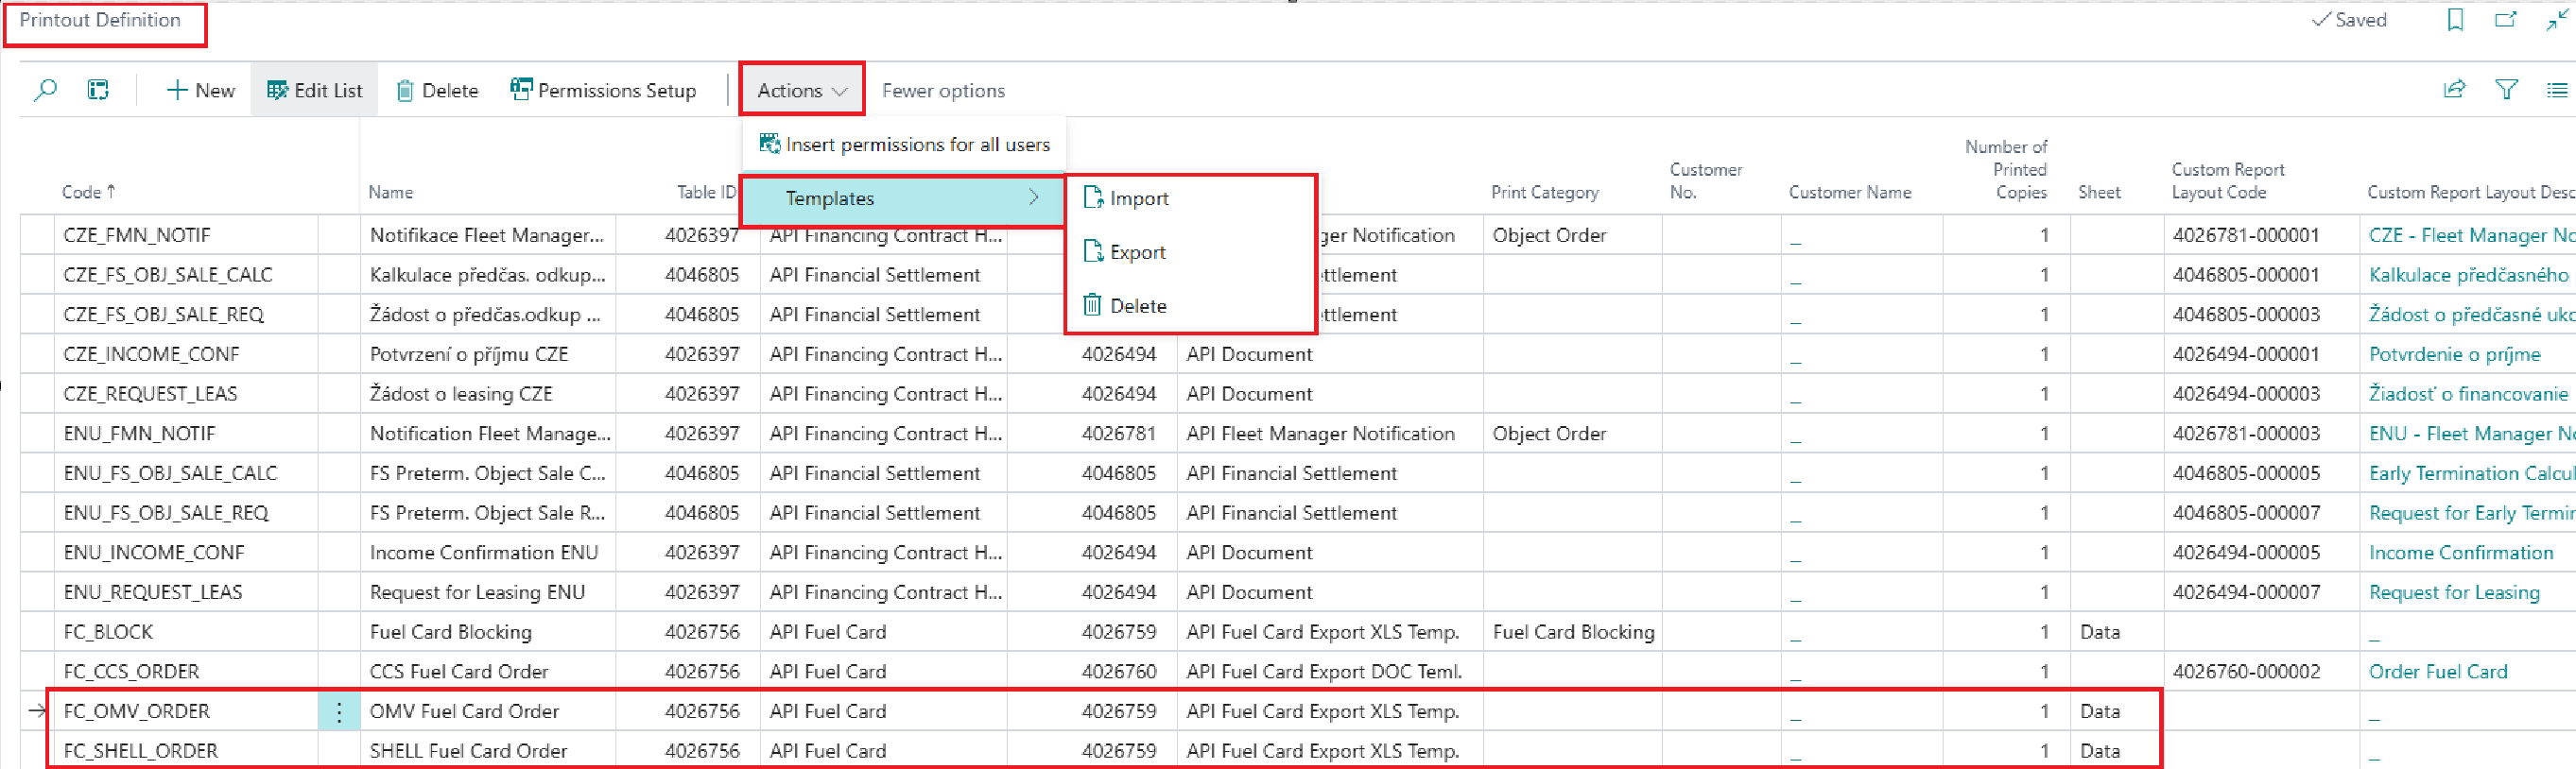
It is necessary to import a template prepared in Excel into a newly created row in the Printout Definition. In this case, we do not use our own layout, but import the template via Actions directly on the given line of the printout definition:
After importing the template, you need to set up a List to be populated by the system via DataSet.
IT is also possible to use Excel functions to edit the template, see example Nastavení pro objednávky tankovacích karet | Definice tiskového výstupu – Excel (Printout Definition – Excel)
Replace Customer Report Layouts with the Report Layouts table
For easier conversions, you need to run a batch that executes:
Custom report layouts → Action → Complete Migration of Custom Report Layouts
Converts layouts from the Custom Report Layout table to Report Layouts. Unlike MS Layout Migration, it also modifies the settings in the tables (copies the settings from the original to the new fields, deletes the values of the original fields and hides them):
-
Report Selections
-
Sales & Receivables Setup
-
API Notification Term
-
API Cust. Inv. Sending Method
-
API Invoicing Printout Setup
-
API Printout Definition
Next, the migration sets the new flag in the OneCore Setup Show New Report Layouts table to Y. THIS ensures that the fields from the page above the tables are hidden in the original Custom Report Layout table and the new fields are displayed. The original ones remain in the table, they will be hidden or their value will be deleted.
If one of the layouts cannot be converted, an informative message with the layout code is displayed during the migration.
You must run the migration in all companies. The layouts are the same table, but the setup is per company.
FOR customers, it is necessary to resolve customer customizations before migration, where there are links to the original custom report layouts.